|
Downloads Installers for Linux/Windows/Mac OS X Software Source Code |
|

Please enable javascript in your
browser to see a site-search form here.
|
|
|||||||||||||||||||||
| Please enable javascript in your
browser to see a site-search form here.
|
||||||||||||||||||||||
| An archived
older version of this page is also available for supporting very old
versions of the software. |
| Item |
Download |
Notes |
|---|---|---|
| Source-code repository |
subversion
repository |
See the instructions for compiling
from source. Note that to match the assumptions of Virtual AGC documentation, when performing a checkout you should explicitly rename the source-tree as "yaAGC": svn checkout http://virtualagc.googlecode.com/svn/trunk/ yaAGC
|
| Source code development snapshot |
yaAGC-dev-20100220.tar.bz2 (same as subversion rev 609) |
See the instructions for compiling
from source. |
| Pre-built Linux x86 binary
package |
VirtualAGC-installer |
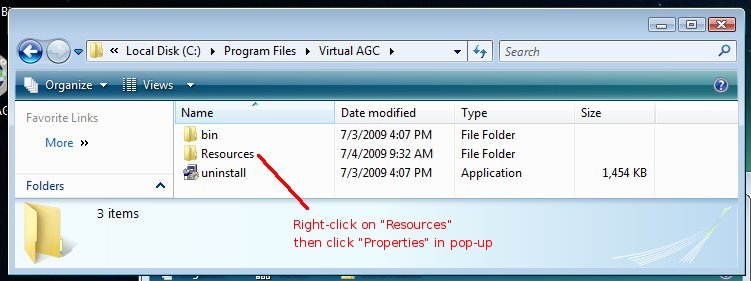
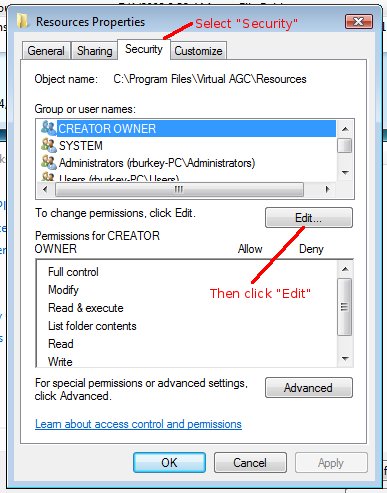
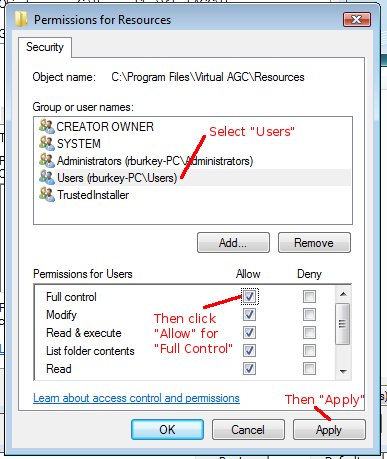
See the installation
instructions and the platform-specific
quirks. |
| Pre-built Win32 binary package |
VirtualAGC-setup.exe |
See the installation instructions and the platform-specific quirks. |
| Pre-built Mac OS X binary package |
VirtualAGC.app.tar.gz |
See the installation instructions and the platform-specific quirks. |
| Prior releases |
Archive |
Note that the Mac OS X binary package includes a program called Terminator which I haven't written, but which is available under the GNU GPL license. If you so desire, you can download the Terminator source code for the version whose binary is being provided by clicking here. I have neither modified nor recompiled this code. Neither the Terminator source code nor binary is versioned as provided here, because the files I downloaded were not versioned by the Terminator project itself.
| Directory |
Contents |
Status |
|---|---|---|
| yaAGC/Colossus249/ |
Source code (*.agc) and binary (*.bin and *.binsource) image
for Build
249
of the Colossus (AGC Command
Module)
program. (Apollo 9.) |
100% complete, proofed, and known to be valid. |
| yaAGC/Luminary131/ |
Source code (*.agc) and binary (*.bin and *.binsource) image
for Build
131
of the Luminary (AGC Lunar
Module)
program. (Apollo 13.) |
100% complete, proofed, and
known to be valid. |
| Some utilities. |
|
|
| yaAGC/Artemis072/ |
Source code (*.agc) and binary (*.bin and *.binsource) image
for Build
072
of the Artemis or Colossus 3 (AGC Command
Module)
program. (Apollo 15-17.) |
100% complete, proofed, and debugged. |
| yaAGC/Comanche055/ |
Source code (*.agc) and binary (*.bin and *.binsource) image
for
Build 055 of Comanche (Colossus 2). (Apollo 11.) |
100% complete, and debugged. |
| yaAGC/Luminary099/ |
Source code (*.agc) and binary (*.bin and *.binsource) image
for
Build 099 of Luminary.
(Apollo 11.) |
100% complete, and debugged. |
| yaAGC/Solarium055/ |
Source code (*.agc) and binary (*.binsource) for Build 055 of Solarium (AGC Command Module) program. (Apollo 4.) | I'm not sure of the present status of this, but it seems
mostly complete. We presently have no way to assemble the source
code to check it against the binary, nor to run the binary in yaAGC, so there's no way to be sure
yet of the accuracy of what we have. |
| yaAGC/yaAGC/ |
Source code for the yaAGC
(AGC emulator) program. |
99% complete. At present, you can expect to see do the stuff described in the Quick Start section of my home page. Both the LM and CM sims should work quite well. |
| yaAGC/ControlPulseSim |
An emulator for the AGC at
the
"control-pulse" (microcode) level rather than the instruction level. |
Allows
interactive simulation of some (but not all) control-pulse
sequences (microcode) for the AGC. This program is only for the
very brave, and very little of it works. I'll probably never
complete much more of it. |
| yaAGC/yaDSKY/ |
Source code for the yaDSKY
(DSKY emulator) program. |
99% complete. (The STBY
and RESTART indicator lamps are
inoperable.) In addition to being a DSKY simulation, this program
can print out downlinked telemetry data. This program has been
superceded by yaDSKY2. |
| yaAGC/yaDSKY2/ |
Source code for the yaDSKY2
(DSKY emulator) program. |
99% complete. (The STBY and RESTART indicator lamps are inoperable.) This program has superceded yaDSKY. |
| yaAGC/yaUniverse/ |
Source code for the yaUniverse
(spacecraft motion
emulator) program. |
Is now capable of modeling the motion of heavenly bodies and spacecraft under gravitational influences. This, perhaps, 25% of what's required in the full program. |
| yaAGC/yaIMU/ |
Source code for the yaIMU (inertial measurement unit emulator) program. | This program has
not
yet
been started. (Because of Stephan Hotto's
contributed LM_Simulator
program, the yaIMU program is
no longer needed, and therefore is no longer being planned.) |
| yaAGC/yaAOT/ |
Source code for the yaAOT (alignment optical telescope emulator) program. | This program has not yet been started. |
| yaAGC/yaACA/ |
Source code for the yaACA (attitude controller assembly emulator) program. | This program is 100% complete
and seems fine on a standalone basis, but the complete system
environment for it has not yet been demonstrated to work. |
| yaAGC/yaACA2/ |
Source code for the yaACA2 (attitude controller assembly emulator) program. | This program is an alternate to yaACA and yaACA3. |
| yaAGC/yaACA3/ |
Source code for the yaACA3 (attitude controller assembly emulator) program. | This program has superceded yaACA. |
| yaAGC/jWiz/ |
Source code for jWiz,
a program to select/configure yaACA,
yaACA2, and yaACA3. |
Working. |
| yaAGC/yaTelemetry/ |
Source code for the yaTelemetry
(telemetry-downlink
console) program. |
This program is 100% complete
and functional. |
| yaAGC/yaYUL/ |
Source code for the yaYUL
(AGC cross-assembler) program. |
100% complete, and capable of
assembling Luminary131, Colossus249, or Validation source code without
error. |
| yaAGC/Validation/ |
Source code for a
(newly-written) program
in AGC assembly-langauge that is used to test the emulator's
instruction set. |
About as complete as it's going to get! |
| yaAGC/yaAGS/ |
Source code for the yaAGS
(Abort Guidance System
emulator) program. |
Now working. Probably
there are a number of bugs and unimplemented features, but at least it
can pass the built-in self-test, and can perform the few operations I
personally know how to activate. :-) |
| yaAGC/yaDEDA/ |
Source code for the yaDEDA
(emulator for the Data Entry
and Display Assembly—i.e., the AGS user interface) program |
I think this program is 100%
working. This program has been superceded by yaDEDA2. |
| yaAGC/yaDEDA2/ |
Source code for the yaDEDA2 (emulator for the Data Entry and Display Assembly—i.e., the AGS user interface) program | I think this program is 100% working. This program has superceded yaDEDA. |
| yaAGC/yaLEMAP/ |
Source code for the yaLEMAP
(AGS cross-assembler)
program. |
I think this program is 100%
working, though there could be bugs I'm not aware of. |
| Sample AGS source code. |
100% complete and correct. |
|
| Utilities |
binLEMAP
--- like Oct2Bin, but for the
AGS instead of
the AGC. 100% working. Needed only for validating
source-code data entry for programs like AGS FP6 or FP8. |
|
| yaAGC/FP6/ |
Source code (*.aea) and binary
(*.bin and *.binsource) for AGS FP6
(Flight
Program 6) |
It is believed that the source code is 100% complete and correct, and that the binary produced by assembling the source with yaLEMAP is 100% complete and correct. |
| yaAGC/FP8/ |
Source code (*.aea) and binary
for AGS FP8
(Flight
Program 8) |
It is believed that the
source
code is 100% complete and correct, and that the binary produced by
assembling the source with yaLEMAP
is 100% complete and correct. |
| yaAGC/Contributed/LM_Simulator/ |
Tcl/Tk
source code,
contributed by Stephan Hotto. |
Continually
evolving in its conception, and I'm not the author, so I can't give a
percentage of completion. At
present, the program has the following features:
|
| yaAGC/Contributed/GamePack/ |
A one- or two-player tic-tac-toe
and a Simon game, contributed by John Pultorak. |
The source code for these games
is complete, but has not presently been converted for the yaYUL assemembler, or adapted
appropriately to actually be run in yaAGC. |
| yaAGC/Contributed/SyntaxHighlight/ |
AGC and AEA assembly-language
highlighters for various text-editor programs in Linux and Windows,
contributed by Onno Hommes. |
Complete. |
| yaAGC/Contributed/DebugScripts/ |
Assistance for GUI-based
debugging of AGC programs, in programs like Code::Blocks, contributed by Onno
Hommes. |
Working. |
| yaAGC/Tools/ yaAGC/Contributed/WireLister/ |
Some tools contributed by Jim
Lawton. I'm not presently sure what all of them are or of their
general utility. |
Don't know. |
| yaAGC/VirtualAGC/ |
Top-level GUI front-end VirtualAGC
for all other Virtual AGC
programs. |
Working and very usable.
(Much more so than the alternative shell scripts it has replaced,
anyhow!) |
| yaAGC/yaASM/ |
A Gemini OBC and Apollo LVDC
assembler. |
This is a work in
progress. It is valueless at present to any end-user. |